
The purpose of this article is to give an overview of the benefits of fermenting in kegs or other pressurized vessels. Fermenting under pressure, purging a serving keg using CO2 generated during fermentation, and transferring to a serving keg under pressure are all ways to avoid oxygen coming into contact with your beer. These techniques also result in your finished beer being carbonated, so you don’t waste CO2 force-carbonating.
Did you know that a 20 liter (5.2 gallon) batch of average strength beer produces between 400 and 600 liters of CO2? That’s a lot of valuable CO2 that’s simply getting blown out of an airlock. Below, I’ll cover ways to use this CO2 for purging additional vessels or carbonating other finished but still beers.
What you need to ferment under pressure
Before I dive into how this works, you’ll first need a few pieces of equipment if you plan on fermenting under pressure:
- A fermentation vessel that can handle pressure (up to at least 25 PSI). If you’re already kegging, using a 5 gallon corny keg is perfect, since it can handle much higher pressure. The only downside? Using a 5-gallon kegs means you’ll need to brew slightly smaller batches, to provide headspace. (10-gallon cornies also exist, but are rarer and more expensive.)
- An additional serving keg, if you plan to rack your beer off the yeast at the end of fermentation, or a floating dip tube if you’re going to serve from the keg.
- Floating dip tubes are also useful for racking beer without sucking up trub, and can be used in dry hop kegs to screen the hops when transferring.
- A pipe cutter, if you prefer to simply shorten your liquid dip tube to avoid sucking up trub from your fermentation keg.
- A spunding valve, to vent pressure during fermentation.
- Quick disconnects, EVABarrier tubing, and necessary DuoTight fittings
- Fermcap (optional)
A word of warning
While fermenting under pressure is generally safe, there are risks. The biggest potential issue with pressure fermentation is a clogged CO2 post or spunding valve, which can cause pressure to build too high.
Take the time to ensure your CO2 posts aren’t clogged and that your spunding valve is working correctly before every fermentation. Ensuring that you have enough headspace and using foam-reducing agents will go a long way to keeping your pressure fermentation safe.
That said, corny kegs also have pressure release valves (PRVs) that will blow long before the keg does. In all likelihood, you’re more likely to experience a flooded fermentation chamber than a corny grenade.
Why ferment under pressure?
Fermenting under pressure comes with many advantages beyond simply saving CO2:
It makes great lagers more achievable. Fermenting under pressure allows you to ferment with lager yeast at warmer temperatures—up to 68F with some strains—and get a cleaner beer than you would fermenting at the same temperature without pressure. This means you can make respectable lagers without needing a fermentation chamber. That said, you’ll get even better lager results fermenting under pressure AND using traditional lager temperatures.
It protects your beer from oxygen. Oxygen is the enemy of beer (except at yeast pitch). It causes stale malt flavors, a darker appearance, and a diminished hop profile, especially over time. One of the best things about pressure-fermenting is that it means once you pitch yeast and close your fermenter, your beer won’t see oxygen again until you pour a pint.
It makes it easy to re-use a yeast cake. Assuming you cleaned your keg well before pitching yeast, the yeast cake left in your fermentation vessel should be very clean and pure. You can keep the keg pressurized in a cool area (or your kegerator/keezer/fermentation chamber) for weeks after racking the finished beer out (though less time is better), then brew a new batch of wort and put it directly on the cake. I’ve had success using this technique for multiple generations.
What to look out for when fermenting under pressure
Leave headspace, and think about using Fermcap. If you’re using a yeast that produces a lot of krausen, it’s advisable to brew a smaller batch (around 4 to 4.5 gallons) and use an anti-foaming agent like Fermcap to prevent krausen from blowing through your jumper tubing and ending up in your serving vessel.
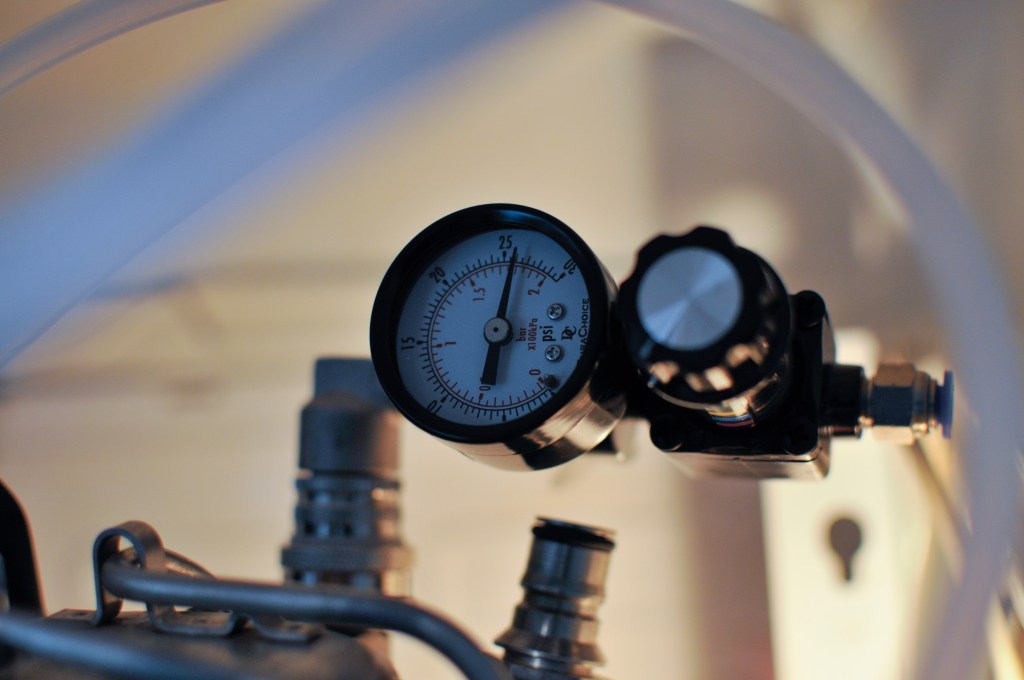
Pick your pressure wisely. There’s a lot of debate regarding the optimal pressure for pressure fermentation. Some people swear by 36 PSI, particularly for lagers (allegedly this mimics the hydrostatic pressure found in large lager producers’ tanks), while others like to stay in the 10-15 PSI range. My spunding valves max out at 30 PSI, so I typically ferment at 25 PSI.
How to use pressure fermentation to purge kegs
One key advantage of pressure fermentation is that it lets you fill a serving keg with completely pure CO2. (Fun fact: Store-bought CO2 isn’t totally pure!)
Ok, so how does this work?
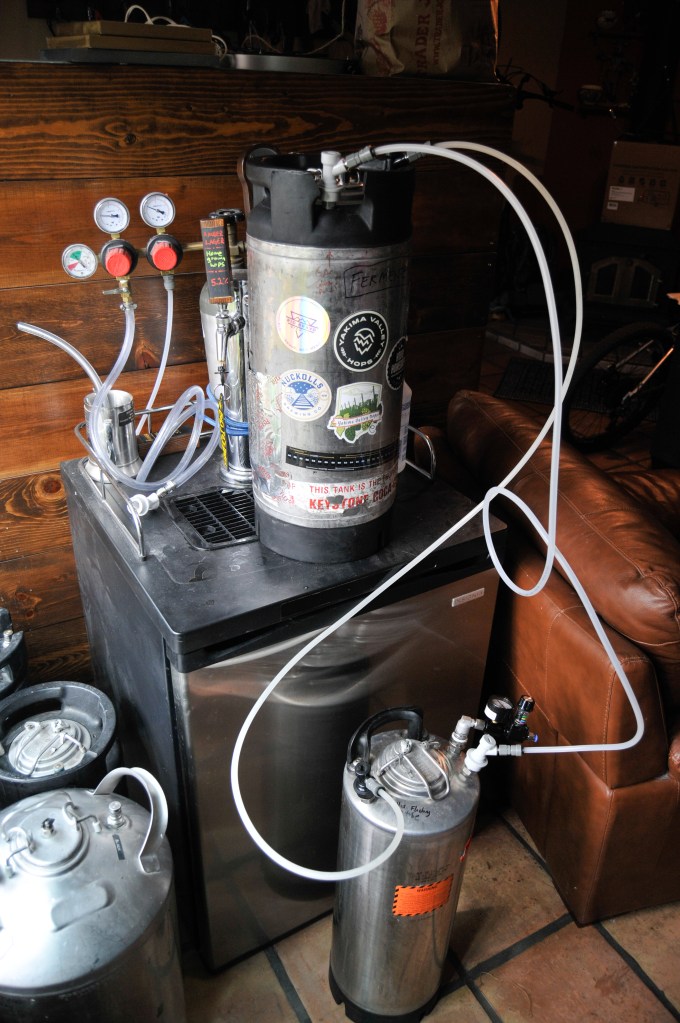
First, you’ll need to create a jumper from your fermentation keg to your serving keg. Here’s how:
- Connect the CO2 post on your fermentation keg to the liquid post on your serving keg using the appropriate quick disconnects and a length of tubing (preferably EVABarrier).
- Attach a spunding valve to the CO2 post on the serving keg and set it to your desired PSI. (You can set it by pressurizing the serving keg with canned CO2 and then fine-tuning the setting on the spund.)

As the pressure created by fermentation builds, the CO2 will move from the fermentation keg, through the jumper, into the bottom of the serving keg and then out the CO2 post through the spunding valve. If you use a fermentation chamber and it’s large enough to fit both kegs, that’s great. If not, you can leave the keg being purged outside the chamber.
This diagram gives a little more clarity to how the kegs are set up, the modifications to the fermentation keg and the flow of CO2 through the system and out the spunding valve. (Note: While the diagram features a cut dip tube in the fermentation keg, you can also use a floating dip tube for the same application.)

Before attaching the jumper, make sure the quick disconnects and tubing have all been cleaned with sanitizer. You can do this manually by taking the jumper apart and soaking in Star San.
This can be a pain if you’re using EVABarrier tubing, since its diameter is so small. Alternatively, you can hook the jumper up to a separate, lightly pressurized keg filled with Star San solution and blast the sanitizer through the jumper via the liquid post. Then, rotate the jumper and hook it up to the CO2 port and shoot the Star San out. This leaves you with a sanitized jumper that’s now filled with CO2.
Purging dry hop kegs
The whole point of fermenting under pressure is to eliminate oxygen from coming into contact with your beer. So, you might be wondering, how do you dry hop a pressurized beer without introducing oxygen?
Good question! Here are three possible methods:
1. Put your dry hops directly in the serving keg. This requires having two kegs and either a floating dip tube or a hop sack or hop spider.
Simply put your hops into your serving keg when you start fermenting, connect the jumper as normal, and let the CO2 purge the oxygen from the hops. When it comes time to dry hop, transfer your beer into the serving keg and let your beer sit on the hops for your required schedule. When dry hopping is done, cold crash it by putting it in your kegerator.
Pros:
- You only need two kegs
- You don’t need to track active fermentation since you won’t be swapping kegs to purge
- You only transfer your beer once (less cleaning)
Cons:
- Your hops sit at higher temps during active fermentation
- Your hops are exposed to oxygen during the beginning of fermentation, before the keg is purged
- Your beer will sit on those hops for a while, potentially leading to undesired flavors
- Mesh hop sacks can get sucked into your liquid dip tube, causing clogging.
2. Use separate serving and dry hop kegs. This method is the better option, but it requires more attention during the first few days of active fermentation.
Start off by attaching the jumper between your serving keg and the fermentation keg and allowing it to purge as normal. Check your gravity frequently, and when you’re halfway between your OG and anticipated FG, add your dry hops to a third sanitized keg. Pressurize it to the same PSI as your fermentation keg, detach the serving keg, and attach the dry hop keg.
When it comes time to dry hop, transfer the beer to the dry hop keg and follow your dry hop schedule. After dry hopping is complete, transfer the beer one last time into the serving keg.
IMPORTANT: If you fail to pressurize your dry hop keg before attaching it to the fermentation keg, the pressure difference will cause foaming and agitation in your beer and may lead to a lot of krausen and wort in your dry hop keg.
Pros:
- Your hops don’t sit as long at fermentation temps
- Your beer won’t sit on dry hops as you drink it
- Your beer may clear sooner since there won’t be as much hop debris in the serving keg
Cons:
- You need to check your beer’s gravity at least once per day to make sure there’s still enough fermentation happening to purge the dry hop keg
- More transfers means more cleaning and more potential vectors for contamination (can be mitigated with good cleaning practices)
3. Daisy-chain three kegs. This is a variant of option #2. If you’re able to keep three kegs in your fermentation chamber, you can use two jumpers and purge your serving and dry hop kegs simultaneously. Just remember to put the spunding valve on the last keg in the chain.
Pros:
- You don’t need to switch kegs halfway through fermentation
Cons:
- Dry hops sit at room temp longer, again

Use that free CO2 for other beverages
If you’re not dry hopping but want to find a way to take advantage of the free CO2 your yeast is producing, there are a couple different ways to capture this CO2 and use it for other projects.
Carbonating water, sodas or seltzer. If you’re like me and sometimes want something cold, bubbly, and booze-free, making your own sparkling water, hop tea and sodas is extremely easy. I’ll leave those recipes for another post, but the takeaway here is that you can carbonate those beverages simply by hooking them up to your actively fermenting beer and placing the spunding valve on the keg containing your n/a beverage.
Carbonating other beer, cider or mead. We’re about to fill our 25 gallon whiskey barrel for the third time. Many of us have a lot of kegged, barrel-aged beer that’s sitting in kegs uncarbonated. Instead of force-carbonating the beer, or bottling it using priming sugar and bottling yeast, you can use the extra CO2 from fermentation to carbonate these beers. You can also use the CO2 to carbonate a stabilized cider or mead.
For both of these ideas, it would be smart to consider a filter that you can place between the two kegs, especially if you’re fermenting something extremely aromatic or phenolic. Without filtering the CO2, you can end up with seltzer that smells like a saison.
If you don’t want to mess with filtering, brewing a big tropical IPA and then using that to carbonate some hop tea could be really delightful. The same could go for carbonating a barrel aged beer if you’re fermenting a stout, brown ale, or porter.
You can also transfer finished beer to a serving keg under pressure
Another key advantage of fermenting under pressure is that you can transfer your beer to your serving keg without exposing it to oxygen.
To do this, you’ll need your pressurized fermentation keg, pressurized and purged serving keg, and two jumpers (liquid to liquid and gas to gas).
To begin, place your fermentation keg above your serving keg like you would for any other gravity transfer. Before you attach your jumpers, it’s important to purge both of them of any oxygen. You can do this by attaching each jumper to the serving keg, then pressing the pin on the opposite quick disconnect to blast a little CO2 through it.

Once that’s done, you can start the transfer. Attach the gas jumper to both gas posts. Then, attach the liquid jumper to the fermentation keg. Hold the end of the liquid jumper that will go on the serving keg over a bowl or glass and press the pin to push enough beer to fill the line. Connect the other end of the liquid jumper to the serving keg and the beer will begin flowing. That’s it!
Once the beer is transferred, disconnect the jumpers and put your serving keg into your kegerator so that it can come to serving temp. Once it’s chilled, re-attach your spunding valve to the CO2 post and slowly reduce the pressure down to your serving PSI. Now you’re ready to serve your beer!
If you only have one keg, you can still pressure ferment!
With this method, you’ll serve your beer directly from the fermentation keg. That has its downsides (more on this below), but it still may be preferable to other fermentation plans since it prevents oxygen exposure.
The key here is to use either a floating dip tube or a shortened liquid dip tube. (Bear in mind that cutting your dip tube isn’t ideal unless you’re willing to dedicate this keg to fermentation rather than serving.)
With the right kind of dip tube installed, you can simply fill the keg with your wort, pitch yeast, and attach your spunding valve to the gas post. Once fermentation is finished, move the keg to your kegerator, let it come to serving temp, and bleed off any excess pressure.
The primary disadvantage to this method is that your finished beer will sit on trub and yeast for as long as you’re drinking it. This isn’t the end of the world, but over time it may be noticeable with delicate styles such as pilsners. In addition, any fluctuation in serving pressure can cause the yeast and trub to get mixed back into the beer.
The other big downside is that it’s difficult to dry-hop or add adjuncts to beers when you ferment and serve this way.
Of course, there are pros and cons to everything, so decide what will work best for you. If you never dry hop or add fruit to your beers, you’re probably totally fine with a single vessel. If you love your hoppy or fruited beers, you’ll probably want to invest in a second vessel.
Your beer is ready!
My most recent beer, a hazy IPA made using Omega Cosmic Punch yeast and hopped with Mosaic and Motueka, was fermented at 26 PSI.
After transferring, I put it in my kegerator and let it get down to temp. I then spunded down to a serving pressure of 12 PSI and poured a glass. The picture below shows the beer came out fully carbonated just 7 hours after putting it in the kegerator.
The only time I used my CO2 tank in the entire process was to attach CO2 set to serving pressure right before I poured my first glass.

Cleaning up after transfer
Cleanup after pressure fermentation is pretty simple, and similar to how you’d clean up after any fermentation or kicked keg. The only difference now is to make sure your jumpers are cleaned out and sanitized.
My typical cleaning process post-pressure fermentation goes like this:
- Depressurize keg(s)
- Rinse several times with hot water and scrub off any visible krausen or hop matter that has built up in the keg
- Rinse again with hot water to get detached krausen bits out
- Soak with PBW
- Add a little bit of head pressure, then blast PBW through both jumpers
- Rinse again with clean water
- Add a little bit of head pressure then blast water through both jumpers
- Star San soak with about 10 PSI of head pressure (I leave Star San solution in my cleaned kegs so I can use it on brew day)
- Blast Star San through jumpers, then blow CO2 through them to remove most of the Star San
After that, your jumpers and keg are all ready for your next brew day. There’s nothing you need to do with your spunding valve as long as no krausen got into it.
Some tips I’ve learned after a couple years of pressure fermentation
- If you’re going to ferment a beer that produces a lot of krausen, even with Fermcap, start off using a blowoff tube connected to the CO2 post on the keg. Put this into a bucket of Star San and wait until the most violent part of fermentation is over. Then, you can connect your jumper to purge the serving vessel
- Scale your batch size down to 4 to 4.5 gallons into the fermenter if you’re using a keg, depending on the yeast strain you’re using (less volume for more active strains). You’ll want the headspace to prevent krausen spilling into your jumper or spunding valve. Lagers can typically do with less headspace than ales.
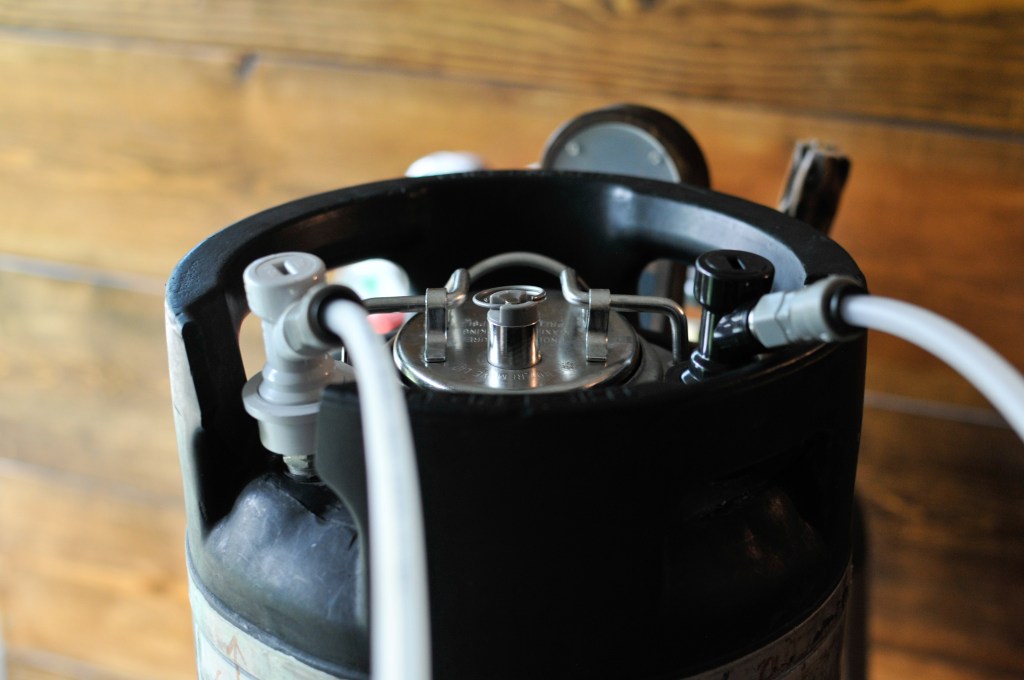
- Cut the CO2 diptube so it’s flush with the underside of your keg. This will help keep krausen from entering it. A dremel tool or pipe cutter makes quick work of this job.
- Make sure you either cut your liquid diptube or use a floating diptube in the fermentation keg. If you don’t do this, you’ll end up with a lot of yeast and trub coming through when you transfer the beer.
- You may think it’s a no-brainer, but label your liquid and CO2 posts on your kegs. Double check you have the correct posts connected via the jumper or else you’ll end up with all your fermenting beer going into your serving keg or through your spunding valve.
Other pressure fermenting vessels and methods
This post focuses on using kegs as pressurized fermentation vessels since they’re cheap, readily available, and what I use in my own setup. But are they the only way? Of course not!
There are a wide variety of pressure-capable vessels of various shapes, sizes, and material. This article was meant to give you the basics which can be carried over to any pressurized fermentation setup.
Aside from kegs, one of the most popular fermenters that can handle pressure is the Fermzilla. The FermZilla is a round, plastic, fermenter that can handle up to 36 PSI. They come in various sizes, but here’s one in 7.9-gallon size.
There are also some cool (and expensive) stainless steel fermenters that look like scaled-down versions of what you’d see in a craft brewery. Some of these can take add-ons like the aptly named “Hop Bong” which makes dry hopping under pressure extremely easy.
What I use for pressure fermenting
- Spunding valve: I use a Spundit 2.0. These are expensive, but are amazingly well built. Another good spunding valve is the BlowTie, which is about half the price of the Spundit and can handle higher pressure.
- Quick disconnects ready for DuoTight fittings: Liquid (x2) and Gas (x2)
- Push-in DuoTight fittings for quick disconnects: DuoTight push-in fitting (x4)
- Jumper tubing: EVABarrier tubing (4mm ID x 8mm OD – 5.5ft) (2x) is a better option than typical red gas tubing because it’s more oxygen-resistant. (Yes, oxygen can affect your beer even during transfers, through the walls of your tubing. I also recommend EVABarrier for serving, for the same reason.)
- Floating diptube: FLOTit 2.0 is what I use. There are many different types found online, including the Torpedo Keg Buoy and Clear Beer Draught System.

Nice write up, Brandon! I’m thinking a mock-up demo of what you explained would be a great topic for a club meeting. I’v used jumpers just for transferring from one corny to another, but this is a whole new level – and introduces some complexity. I somehow came across some red tubing that I use so I know I’m only using it for transfer – and it’s red for easy identification. Blue tubing is also accessible. Maybe a good recommendation for illustrating this really cool process?
LikeLike
Thanks for the idea, Scott! A demonstration would be pretty easy to do at a future meeting or event.
LikeLike